Simple Wireless Bluetooth Stereo Audio System for Outdoor Use
Pretend that the weather is warm and it is a nice time to be outdoors chatting with friends. You want some background music, but where will it come from?
When people want portable music, they usually rely on battery-powered audio devices. Of course you can buy a sound system for outdoor use, but those can be quite expensive and, as we shall show, unnecessary. With just a bit of engineering blood (or curiosity) running in your veins, it is not that difficult to build a wireless Bluetooth® stereo audio system that can be controlled with any device that has a Bluetooth connection and a music player.
This application note describes how to build a simple and fairly low-cost wireless Bluetooth stereo audio system for outdoor use. The system has 20WRMS output power. It can be controlled either with a handset that has a Bluetooth connection and a music player, or with an Apple® iPod® model. Three appendices discuss additional layout considerations, the differences between using a Class D and Class AB amplifier in the design, and the cost of the system.
详情介绍
Pretend that the weather is warm and it is a nice time to be outdoors chatting with friends. You want some background music, but where will it come from?
When people want portable music, they usually rely on battery-powered audio devices. Of course you can buy a sound system for outdoor use, but those can be quite expensive and, as we shall show, unnecessary. With just a bit of engineering blood (or curiosity) running in your veins, it is not that difficult to build a wireless Bluetooth® stereo audio system that can be controlled with any device that has a Bluetooth connection and a music player.
This application note describes how to build a simple and fairly low-cost wireless Bluetooth stereo audio system for outdoor use. The system has 20WRMS output power. It can be controlled either with a handset that has a Bluetooth connection and a music player, or with an Apple® iPod® model. Three appendices discuss additional layout considerations, the differences between using a Class D and Class AB amplifier in the design, and the cost of the system.
Bluetooth Basics
Bluetooth technology was created on 1994 and is widely used to establish a short-range wireless connection between two handheld mobile devices. A Bluetooth setup also lets you transfer a stereo audio signal from a handheld device to a wireless headset. Today's Bluetooth headsets operate under the Bluetooth Class 2 specification with 2.5mW (4dBm) transmission power. The transmission range for a Bluetooth Class 2 module is approximately 10 meters.
Putting the Bluetooth Audio System Together
Bluetooth headsets are usually used with fairly small-sized, 32Ω speakers. By connecting the audio signal from a Bluetooth headset to an external amplifier, it is possible to amplify the signal. The Bluetooth stereo headset then acts as a bridge, delivering the audio signal from the handheld device to a stereo audio amplifier and creating a wireless stereo audio system.
A block diagram of the system is described in Figure 1.
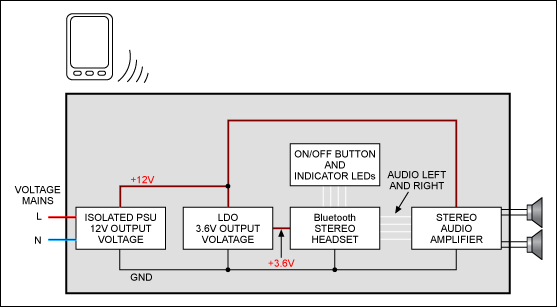
Figure 1. Block diagram of wireless Bluetooth stereo audio system.
This system is based on a stereo Class D audio amplifier which is driving a pair of 4Ω speakers.
Determining the Output Power
The output power requirement is 20WRMS (10WRMS per channel). One should note that measuring RMS output power is not the optimal way to determine an amplifier's output power; RMS does not really reveal much about an amplifier's true performance. Therefore, in this article RMS output power actually refers to the average sine-wave power into a resistive load. RMS output power is used mainly for comparative purposes.
The 20WRMS translates to 40W peak output power. To achieve 10WRMS per channel into 4Ω speakers, the minimum supply voltage (VRMS) needs to be:

For peak output voltage, this translates to:

The above equations show that a 9V supply voltage would be enough to achieve 10WRMS output power per channel. However this design uses a 12V supply voltage to allow some room for the power-supply unit's (PSU) output voltage to drop during a heavy load.
For an isolated PSU with a 12V output voltage, a low-cost LED driver voltage supply is used. These supplies are readily available from any electronics store. Choose a PSU that matches the output power.
As an aside, it is important to realize that 20WRMS total output power does not necessarily mean anything to most people. For comparison, think about low-cost car audio amplifiers or low-cost portable audio "boom-box" products. They are often advertised as providing 40W total output power, but this is normally peak output power which translates to 20WRMS output power.
You may ask, finally, whether 20WRMS is really enough output power for this system to work adequately? Yes, it is. Low-cost car audio amplifiers do not normally have a step-up DC-DC converter, so they use 12V from the car's battery to drive the speakers. (Actually, a car's battery voltage is approximately 13.8V, but this is not important here.) Listen to these low-cost amplifiers— they produce plenty of sound. Admittedly, 20WRMS output power is not enough to keep the whole neighborhood awake, but that is not a priority for our system anyway.
Selecting the Bluetooth Headset, On/Off Switch, and LEDs
You can use any headset with a 3.5mm audio connector. A Nokia® BH-214 Bluetooth stereo headset is used in this design. It has the 3.5mm audio connector, making it very easy to take audio signals from a headset's PCB and feed signals to the stereo audio amplifier.
An On/Off switch and indicator LEDs are also needed. These signals need to be taken from the Nokia headset.
Modifying the Nokia BH-214 Headset
The Nokia headset needs to be modified. Since some signals come from outside the headset's PCB, a few wires need to be soldered to that PCB to enable signal transmission. Figures 2 to 6 show how this is done.
With the front cover of the headset facing you, open it by gently squeezing with a small screwdriver at the right corners, top and bottom. Remove the plastic faceplate and remove the keyboard rubber. Gently pull the part containing the PCB from the bottom enclosure.

Figure 2. Headset front cover, inside view.
With the front cover open, make some extra room for wires by clipping off some plastic from the area circled in Figure 2. Also remove the light guide and the plastic enclosure for the On/Off switch.
Working from Figure 3, solder off the On/Off-switch (1), the bicolor LED (2), blue LED (3), and battery wires (4). Remove the battery from PCB.

Figure 3. Close-up view of the PCB for the headset.
Now solder wires to the On/Off switch pads (1), as shown by arrows in Figure 3. Then solder a wire to the bicolor LED common anode pad (2), as shown by those arrows. Solder a wire to the blue LED anode pad (3). Finally, solder wires to the battery pads (4).
Use the thinnest wires that you can find, and note the colors of wires for future reference.
There are three more wires (Figure 4) that need to be soldered to the headset.

Figure 4. LED wires soldered to headset (right) with close-up view (left).
Solder the green LED cathode (5), red LED cathode (6), and blue LED cathode (7) to resistors as shown in Figure 4. Now there should be wires for the following signals:
- Two wires for the Bluetooth headset's On/Off switch
- Three wires for the green and red bicolor LEDs (i.e., the common anode, green cathode, and red cathode)
- Two wires for the blue LED (anode and cathode)
- Two wires for the battery terminals (for 3.6V from the LDO)
When all wires are soldered to the PCB, gently put the headset back together. Close the enclosure with caution, since it is very easy to detach a pad from the PCB by pulling the wire. After modifications, the headset will look like Figure 5.

Figure 5. The modified headset with cover replaced.
Examining the Stereo Audio Amplifier Board
The stereo audio amplifier in this design is the MAX98400A Class D amplifier. (See Appendix 2 for a discussion of why a Class D amplifier is better suited for this application than a Class AB linear amplifier.) This amplifier has a high 107dB signal-to-noise ratio (SNR). Speakers can be connected directly to the amplifier's outputs without an output filter and without big, bulky DC-blocking capacitors. This latter point is very important. Traditional Class D amplifiers need an output filter to recover the audio signal from amplifier output. The MAX98400A relies on the inherent inductance of speaker coil to recover the audio component of the square-wave output. Eliminating the output filter and DC-blocking capacitors saves considerable space on the PCB.
A linear voltage regulator (MAX16910) is integrated in the stereo audio amplifier. The regulator converts a 12V supply to 3.6V. The LDO output is connected to the headset's battery terminals. The LDO's output voltage can be between 3.4V and 4.2V. With its 30V (max) input voltage and built-in thermal and overload protection, the MAX16910 is ideal for this application. In fact, with the R1 and R2 values shown in Figure 6, the LDO's output voltage will be approximately 3.8V, which is ideal here.

Figure 6. Stereo audio amplifier board schematic.
From Figure 6 it is apparent that the MAX98400A amplifier needs few external components for its function. The amplifier's gain is selected with SV1 and SV2; maximum gain is 32.9dB, which equals 44.2V/V:

The maximum gain is selected when SV1 is open and SV2 pins 1 and 2 are connected together (Table 1).
| Table 1. Gain Settings for the MAX98400A Stereo Audio Amplifier | |||
| SV1 | SV2 | Gain (dB) | Gain (V/V) |
|---|---|---|---|
| 2–3 | 2–3 | 9 | 2.8 |
| Open | 2–3 | 13 | 4.5 |
| 1–2 | 2–3 | 16.7 | 6.8 |
| 2–3 | Open | 20.1 | 10.1 |
| Open | Open | 23.3 | 14.6 |
| 1–2 | Open | 26.4 | 20.9 |
| 2–3 | 1–2 | 29.8 | 30.9 |
| Open | 1–2 | 32.9 | 44.2 |
Therefore, with a 12V supply voltage and 44.2V/V gain, the maximum input signal that can be used without clipping and distortion to the output signal is:

The amplifier has an integrated clipping-limiter circuit that prevents output clipping distortion. That capability is very convenient, because with maximum gain and without the clipping limiter the headset's output signal would need to be adjusted to 270mV (max) to ensure that the audio amplifier's output signal is not clipped and distorted when volume is set at maximum level. Alternatively, the MAX98400A's gain can be lowered by choosing different settings for SV1 and SV2.
There are thermal issues to consider. With a 12V supply voltage and a 4Ω load, the amplifier's efficiency with 20WRMS output power is approximately 85%. We can calculate how much power is dissipated in the amplifier with the following formula:

The MAX98400A is in 36-pin TQFN package, which means that an external heatsink cannot be used very easily. An alternate way to remove excess heat from the amplifier is to connect the exposed pad located underneath it to the PCB's copper plane with multiple vias. To lessen any further concerns about temperature, the MAX98400A has built-in thermal overload protection.
Consequently, when this Bluetooth audio system is used in a very warm ambient temperature and the audio amplifier is delivering its highest possible output power, nothing will be damaged or destroyed.
Assembling the System
The system is finally assembled into an industrial waterproof enclosure sized 120mm x 160mm. Figures 7 and 8 show the assembled and fully functional system with all required building blocks.

Figure 7. The system assembled in an enclosure.

Figure 8. System enclosure viewed on an outdoor wall.
Now Make Some Music
This article has explained how to make an inexpensive wireless Bluetooth stereo audio system for outdoor use. Now it is time to mount the system enclosure on a hard surface like a wall, connect the speakers, and plug mains voltage into the audio system. Establish a Bluetooth connection and you are ready to rock and roll!
Appendix 1
Things to Consider
Audio Amplifier
There are always electromagnetic interference (EMI) issues to consider when using a Class D audio amplifier in a design. If your system needs long speaker cables (over 1m), it would be good to use a ferrite bead mounted to the speaker cable to reduce radiated emissions.
Additionally, stereo amplifiers with Maxim's active emissions limiting technology make it easier to comply with EN55022B EMI limits. Active emissions limiting greatly reduces radiated emissions. The technology optimizes the output FET gate transitions, reducing over- and undershoots dramatically, to provide very good EMI performance without degrading the audio performance (Figure 9).

Figure 9. Maxim Class-D wavefoRMS with and without active emissions limiting. The over- and undershoots seen on the data at the right are sources of radiated emission.
Stereo Bluetooth Headset
There are many different layouts when assembling the PSU, stereo Bluetooth headset, audio amplifier, switches, and LEDs into an enclosure. Make sure that no cables cross the headset's Bluetooth antenna, since that can reduce the Bluetooth range.
Also, do not mount the system very near other wireless transmitters, for example beside a WLAN router, because this those transmissions can interfere with the headset's reception.
Power-Supply Unit (PSU)
The amplifier in this design has a high 67dB PSRR which eliminates the need for a tightly regulated power supply. Nonetheless, be sure to choose a PSU that has reasonably good output voltage regulation. This, in practice, means that one should not use the lowest-cost PSU available.
Indicator LEDs
Perhaps the hardest part of building this system is soldering wires to the LED indicator pads located on the Nokia BH-214 PCB. If you have any doubts about soldering these wires, change to an enclosure with a transparent front cover. In that case, the stereo Bluetooth headset would be mounted sideways to make indicator LEDs visible through the front cover. Now the LED indicators would not need to be removed from the PCB.
The wires for the On/Off switch and the wires to the battery pads still need to be soldered to the headset's PCB. That soldering job is much easier than soldering for the LED indicators.
The power-on LED is optional. If you choose to mount it, a series resistor must be used to limit LED current. Calculate the LED series resistor value with following:

When the LEDs are supplied from the 3.6V LDO output and when the LED forward voltage is 1.8V with, for example, an 8mA LED current, then the series resistor would be:

Appendix 2
Trade-offs Between a Class D and Class AB Amplifier
This design uses a Class D audio amplifier for the reasons outlined above. Perhaps, however, you have a Class AB linear amplifier and want to use it in the design instead? The system will be much less efficient. A Class AB linear amplifier operating under same conditions will have approximately 50% less efficiency than the Class D device, meaning that there will be 10W of dissipated (wasted) power in the amplifier. Therefore, a fairly large heatsink would be required for thermal protection.
When you consider how much power a Class AB amplifier would waste in this application, it is easier to understand why the term "RMS output power" is misleading. Assume that two amplifiers, a Class D and a Class AB amplifier, are delivering the same 20WRMS output power. In our example, the MAX98400A will dissipate 3.5W and a Class AB amplifier will dissipate 10W. Thus, even when the RMS output power seems to be the same, the Class AB amplifier cannot deliver as much power to the speakers because it is wasting so much power. In the end, less power translates to considerably less sound.
Appendix 3
System Parts
A system part list is shown in Table 2.
| Table 2. System Parts List | |||
| Part | Qty | Description | |
|---|---|---|---|
| 12V Power Supply | 1 | LSP10X LED driver module or similar (included mains supply cable) | |
| Bluetooth Headset | 1 | Nokia BH-214 stereo Bluetooth headset | |
| Enclosure | 1 | IDE 55DS161 EL161 18800 or similar | |
| Green LED | 1 | Ultra-bright, 3mm or 5mm green LED to indicate if system is powered | |
| Bicolor LED | 1 | 3mm or 5mm, common-anode, bicolor LED to indicate system status | |
| Blue LED | 1 | Ultra-bright, 3mm or 5mm blue LED to indicate Bluetooth connection status | |
| LED Collar | 3 | Metallic, 3mm or 5mm, LED collar (depends on the size of LEDs used) | |
| On/Off Button | 1 | Miyama MS-016 switch or similar (be sure not to use a locking switch) | |
| Mains Switch | 1 | Arco H8550VBBB01 6A/250VAC switch or similar | |
| Cable Clamp | 1 | Cable clamp/strain relief for mains supply cable | |
| RCA Connector | 2 | Chassis-mounted RCA female connector | |
Apple is a registered trademark of Apple Inc.
iPod is a registered trademark of Apple Inc.
Nokia is a registered trademark and registered service mark of Nokia Corporation.
The Bluetooth word mark and logos are registered trademarks owned by Bluetooth SIG, Inc. and any use of such marks by Maxim is under license.